
Python学习个人记录笔记
目录
- 文件操作
- 循环
- 正则表达式
- requests
- xpath
- asyncio
- selenium
- scrapy
- 安装:
- 新建工程
- 增加py文件
- **持久化存储:**
- 分页信息的爬取
- 请求传参:
- 图片
- 下载中间件
- crawlspider
- 分布式爬虫
- 增量式爬虫
- 打包exe
- 快捷键
文件操作
创建目录
import os
if not os.path.exists('./tupians'):os.mkdir('./tupians')
存储图片
imgData = data#二进制图片数据
with open('./tupians.jpg','wb') as fp:fp.write(imgData)
循环
for pageNum in range(1,36):print(pageNum)
#1,2,3...
arr = [1,1,2]
for a in arr:print(a)
#1,1,2
正则表达式
import re
ex = '.*?![]() '
imgSrc = re.findall(ex,response,re.S)# .*? 非贪婪匹配任意字符
# re.S 和换行符有关貌似
'
imgSrc = re.findall(ex,response,re.S)# .*? 非贪婪匹配任意字符
# re.S 和换行符有关貌似
requests
# 发起Get请求获取文本信息,连接地址为newUrl(字符串),请求头为headers(对象)
response = requests.get(url=newUrl,headers=headers).text
# 发起Get请求获取二进制流信息,连接地址为src(字符串),请求头为headers2(对象)
imgData = requests.get(url=src,headers=headers2).content# 发起Post请求,请求数据为 data(对象)
response = requests.post(url=newUrl,headers=headers,data=data)
response.status_code#请求状态码,可以判断请求是否成功 200# 设置cookie 请求头中自动自动加入Cookie字段
session = requests.Session()
session.post(url=url,headers=headers,data=data).text# 代理ip
response = requests.get(url=url,headers=headers,proxies={"https":"202.12.1.22"}).text
代理:www.goubanjia.com
xpath
属性包含
res = requests.get(url=linkPath,headers=headers).text
tree = etree.HTML(res)
links = tree.xpath('//div[contains(@class,"ws_block")]/a')
asyncio
import asyncioasync def request(url):print('begin')return 'over'#async修饰的函数,调用之后返回一个协程对象
c = request('www.baidu.com')#报错There is no current event loop python
loop = asyncio.new_event_loop()
asyncio.set_event_loop(loop)#创建一个事件循环对象 报错There is no current event loop python,使用上面两句替换
#loop = asyncio.get_event_loop()#将协程对象注册到loop中,然后启动loop
#loop.run_until_complete(c)###task 创建task对象
##task = loop.create_task(c)
##print(task)
##
##loop.run_until_complete(task)
##print(task)###future 创建future对象
##task = asyncio.ensure_future(c)
##print(task)
##
##loop.run_until_complete(task)
##print(task)#绑定回调
def callbackFn(task):print(task.result())
task = asyncio.ensure_future(c)
task.add_done_callback(callbackFn)
loop.run_until_complete(task)print('all over')
报错:There is no current event loop
将下面一句:
loop = asyncio.get_event_loop()
替换成下面两句即可
loop = asyncio.new_event_loop()
asyncio.set_event_loop(loop)
多任务
import asyncio
import timeasync def request(url):print('begin',url)await asyncio.sleep(2)print('end',url)
start = time.time()
urls= ['www.baidu.com','www.souhu.com','www.sogou.com']loop = asyncio.new_event_loop()
asyncio.set_event_loop(loop)stasks = []
for url in urls:c=request(url)task = asyncio.ensure_future(c)stasks.append(task)#loop = asyncio.get_event_loop()
loop.run_until_complete(asyncio.wait(stasks))stop = time.time()
print(stop-start)
带延时服务用例
from flask import Flask
import timeapp = Flask(__name__)@app.route('/walk')
def index_walk():time.sleep(2)return 'i walk'@app.route('/say')
def index_say():time.sleep(2)return 'i say'@app.route('/sing')
def index_sing():time.sleep(2)return 'i sing'if __name__ =='__main__':app.run(debug=True)
基于aiohttp的异步请求
import requests
import time
import asyncio
import aiohttpstart = time.time()
urls = ['http://127.0.0.1:5000/walk','http://127.0.0.1:5000/sing','http://127.0.0.1:5000/say']async def getPage(url):print('begin',url)async with aiohttp.ClientSession() as session:#使用post()发起post请求#headers=headers,增加头;params,data同样;proxy='http://ip:port'async with await session.get(url) as response:pageText = await response.text() #read()返回二进制;json()返回json对象print('over1',url)#response = requests.get(url=url)print('over2',url)pool = asyncio.new_event_loop()
asyncio.set_event_loop(pool)tasks=[]
for url in urls:c = getPage(url)task = asyncio.ensure_future(c)tasks.append(task)pool.run_until_complete(asyncio.wait(tasks))end = time.time()
print(end-start)
begin http://127.0.0.1:5000/walk
begin http://127.0.0.1:5000/sing
begin http://127.0.0.1:5000/say
over1 http://127.0.0.1:5000/say
over2 http://127.0.0.1:5000/say
over1 http://127.0.0.1:5000/walk
over1 http://127.0.0.1:5000/sing
over2 http://127.0.0.1:5000/walk
over2 http://127.0.0.1:5000/sing
2.1247029304504395
selenium
下载浏览器驱动:http://chromedriver.storage.googleapis.com/index.html
对应关系:https://blog.csdn.net/huilan_same/article/details/51896672
示例
from selenium import webdriver
from time import sleep
from selenium.webdriver.chrome.service import Service
from selenium.webdriver.common.by import Bys = Service('./chromedriver.exe')
bro = webdriver.Chrome(service = s)bro.get('https://www.taobao.com/')
#标签定位
search_input = bro.find_element('id','q')
#标签交互
search_input.send_keys('IPhone')#执行js程序
bro.execute_script('window.scrollTo(0,document.body.scrollHeight)')
sleep(2)
#点击搜索按钮
btn = bro.find_element(By.CSS_SELECTOR,'.btn-search')
btn.click()bro.get('https://www.baidu.com')
sleep(2)
#后退
bro.back()
sleep(2)
#前进
bro.forward()
sleep(2)sleep(5)
bro.quit()
iframe及拖拽
from selenium import webdriver
from selenium.webdriver import ActionChains
from time import sleep
s = webdriver.chrome.service.Service('./chromedriver.exe')
bro = webdriver.Chrome(service=s)
bro.get('https://www.runoob.com/try/try.php?filename=tryhtml5_draganddrop')
#切换作用域到iframe
bro.switch_to.frame('iframeResult')
div = bro.find_element('id','drag1')
print(div)
#动作链
action = ActionChains(bro)
#点击长按指定标签
#action.click_and_hold(div)element = bro.find_element('id','div1')
print(element)
sleep(3)
action.drag_and_drop(div, element).perform()##element = bro.find_element('id','div1')
##action.move_to_element(element).perform()##for i in range(5):
## #perform()立即执行动作链操作
## action.move_by_offset(0,-5).perform()
## sleep(0.3)#释放
action.release().perform()
sleep(1)
bro.quit()
没有成功,不知道什么原因
无可视化界面
from selenium import webdriver
from time import sleep
from selenium.webdriver.chrome.options import Options
#规避检测
from selenium.webdriver import ChromeOptionsoption = ChromeOptions()
option.add_experimental_option('excludeSwitches',['enable-automation'])chrome_options = Options()
chrome_options.add_argument('--headless')
chrome_options.add_argument('--disable-gpu')
#optionss = webdriver.chrome.service.Service('./chromedriver.exe')
#options = option
bro = webdriver.Chrome(service=s,options = chrome_options)#无头浏览器
bro.get('https://www.baidu.com')print(bro.page_source)
sleep(2)
bro.quit()
超级鹰:
注册用户,充值,创建软件,下载示例
www.chaojiying.com/about.html
截图
from selenium import webdriver
from time import sleep
from selenium.webdriver.common.by import Bys = webdriver.chrome.service.Service('./chromedriver.exe')
bro = webdriver.Chrome(service = s)#bro.get('https://kyfw.12306.cn/otn/login/init')
bro.get('https://www.sina.com.cn/')bro.save_screenshot('aa.png')
#imgEle= bro.find_element('class','hxjzg')
#imgEle= bro.find_element(By.XPATH,'/html/body/div[12]/div/a[2]')
#imgEle.save_screenshot('bb.png')sleep(4)
bro.quit()
scrapy
安装:
- pip install wheel
- 下载twisted ,地址:https://www.lfd.uci.edu/~gohlke/pythonlibs/#twisted
- 安装twisted:pip install Twisted-…whl
- pip install pywin32
- pip install scrapy
新建工程
安装时没有添加到环境变量,找到路径执行C:\Users\admin\AppData\Roaming\Python\Python310\Scripts
新建工程执行:scrapy startproject helloscrapy(C:\Users\admin\AppData\Roaming\Python\Python310\Scripts\scrapy.exe startproject helloscrapy)
新工程目录结构:
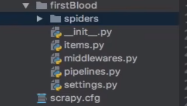
(原来插入图片的水印是可以去除的)
增加py文件
cd到firstBlood中执行命令:scrapy genspider spiderName wwww.xxx.com(C:\Users\admin\AppData\Roaming\Python\Python310\Scripts\scrapy.exe genspider spiderName wwww.xxx.com)
就会在spiders中创建一个名为 spiderName.py 的文件。
这里把spiderName换乘first后执行:
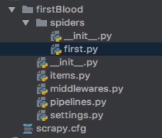
first.py内容
import scrapy
class FirstSpider(scrapy.Spider):#爬虫文件的名称:就是爬虫源文件的唯一标识name = "first"#允许的域名:用来限定start_urls列表中哪些url可以进行请求发送,可注释allowed_domains = ["www.xxx.com"]#起始url列表:该列表中存放的url会被scrapy自动进行请求发送start_urls = ["http://www.xxx.com/"]#用作于数据解析,response是请求成功后的响应对象,调用次数由start_urls长度确定def parse(self, response):pass
执行工程:scrapy crawl spiderName,spiderName就是新创建文件的名字
请求前需要先修改裙子协议:
settings.py中ROBOTSTXT_OBEY=True改为False
设置日志输出等级:
settings.py中增加LOG_LEVEL='ERROR'
设置ua伪装,填写对应ua信息
USER_AGENT=‘Mozilla/5.0 (Windows NT 10.0; Win64; x64) AppleWebKit/537.36 (KHTML, like Gecko) Chrome/110.0.0.0 Safari/537.36’
如:
import scrapyclass XiaohuaSpider(scrapy.Spider):name = "xiaohua"#allowed_domains = ["www.xxx.com"]start_urls = ["https://www.xiaohua.com/"]def parse(self, response):divList = response.xpath('//div[@class="content-left"]/div')for div in divList:user = div.xpath('./div[1]/div//i/text()')[0].extract()content = div.xpath('./p/a/text()').extract()content = ''.join(content)print(user,content)break
cd 到xiaohuaPro工程路径中,执行scrapy crawl xiaohua
持久化存储:
终端指令:只可以将parse的返回值存储到文本文件中。scrapy crawl first -o ./wenben.csv;文本类型需要为:‘json’, ‘jsonlines’, ‘jsonl’, ‘jl’, ‘csv’, ‘xml’, ‘marshal’, ‘pickle’
如:
import scrapy
class XiaohuaSpider(scrapy.Spider):name = "xiaohua"#allowed_domains = ["www.xxx.com"]start_urls = ["https://www.xiaohua.com/"]def parse(self, response):alldata = []divList = response.xpath('//div[@class="content-left"]/div')for div in divList:user = div.xpath('./div[1]/div//i/text()')[0].extract()content = div.xpath('./p/a/text()').extract()content = ''.join(content)#print(user,content)#breakdic = {'author':user,'content':content}alldata.append(dic)return alldata
基于管道:
- 在item类中定义相关的属性
- 将解析的数据封装存储到item类型的对象
- 将item类型的对象提交给管道进行持久化存储的操作
- 在管道类的process_item中要将其接收到的item对象中存储的数据进行持久化存储操作
- 在配置文件中开启管道
举例:
item.py
# Define here the models for your scraped items
#
# See documentation in:
# https://docs.scrapy.org/en/latest/topics/items.htmlimport scrapyclass XiaohuaproItem(scrapy.Item):# define the fields for your item here like:# name = scrapy.Field()author = scrapy.Field()content = scrapy.Field()#pass
xiaohua.py
import scrapy
from xiaohuaPro.items import XiaohuaproItemclass XiaohuaSpider(scrapy.Spider):name = "xiaohua"#allowed_domains = ["www.xxx.com"]start_urls = ["https://www.xiaohua.com/"]def parse(self, response):alldata = []divList = response.xpath('//div[@class="content-left"]/div')for div in divList:user = div.xpath('./div[1]/div//i/text()').extract()user = ''.join(user)content = div.xpath('./p/a/text()').extract()content = ''.join(content)#print(user,content)#breakdic = {'author':user,'content':content}alldata.append(dic)item = XiaohuaproItem()item['author']=useritem['content']=contentyield item#提交到了管道return alldata
settings.py
ITEM_PIPELINES = {"xiaohuaPro.pipelines.XiaohuaproPipeline": 300,
}
pipelines.py
# Define your item pipelines here
#
# Don't forget to add your pipeline to the ITEM_PIPELINES setting
# See: https://docs.scrapy.org/en/latest/topics/item-pipeline.html# useful for handling different item types with a single interface
from itemadapter import ItemAdapterclass XiaohuaproPipeline:fp=None#重写父类方法def open_spider(self,spider):print('begin')self.fp = open('./xiaohua.txt','w',encoding='utf-8')#专门处理item类型对象#每次接受一个item对象就会被调用一次def process_item(self, item, spider):author = item['author']content = item['content']self.fp.write(author+':'+content+'\n')return item#def close_spider(self,spider):print('end')self.fp.close()
如果想要将数据同时存到mysql一份,需要在pipelines.py中增加以下内容:
import pymysql
class XiaohuaproMysqlPipeline:conn = Nonecursor=Nonedef open_spider(self,spider):self.conn = pymysql.Connect(host='127.0.0.1',port=3306,user='root',password='123',db='xiaohua',charset='utf8')def process_item(self, item, spider):self.cursor = self.conn.cursor()try:self.cursor.execute('insert into xiaohua values("%s","%s")'%(item['author'],item["content"]))self.conn.commit()except Exception as e:print(e)self.conn.rollback()return item #会传递给下一个即将执行存储的管道类def close_spider(self,spider):self.cursor.close()self.conn.close()
同时修改settings.py
ITEM_PIPELINES = {"xiaohuaPro.pipelines.XiaohuaproPipeline": 300,"xiaohuaPro.pipelines.XiaohuaproMysqlPipeline": 301,
}
分页信息的爬取
import scrapyclass YhdmSpider(scrapy.Spider):name = "yhdm"#allowed_domains = ["www.xxx.com"]start_urls = ["http://www.yhdmp.net/list/"]url = 'https://www.yhdmp.net/list/?pagesize=24&pageindex=%d'pageName = 1def parse(self, response):lists = response.xpath('//div[@class="lpic"]/ul/li')for li in lists:name = li.xpath('./h2/a/text()').extract_first()print(name)if self.pageName <= 2:newUrl = format(self.url%self.pageName)self.pageName+=1#手动发送请求yield scrapy.Request(url=newUrl,callback=self.parse)
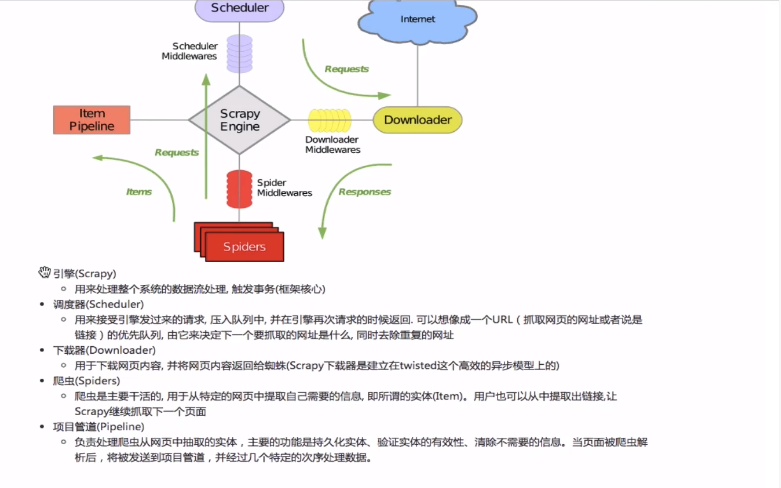
偷了张图(哔站的“Python网红Alex”)
请求传参:
整体思路如下,没有测试
import scrapy
from itemPro.items import proItemclass targetSpider(scrapy.Spider):name = 'boss'starturls = ['https://www.xxx.com']url = 'https://www.xxx.com/page=%d'pageNum = 2def parseDetail(self,response):item = response.meta['item']desc = response.xpath('//*[@id="myid"]/div//text()').extract()desc = ''.join(desc)item['desc'] = descyield itemdef parse(self,response):lists = response.xpath('//*[@id="myidall"]/div/ul')for li in lists:item = proItem()name = li.xpath('.//div[@class=""]/a/div/text()').extract_first()item['name'] = namedetailUrl = 'https://www.xxx.com' + li.xpath('.//div[@class=""]/a/text()').extra_first()yield scrapy.Request(detailUrl,callback = self.parseDetail,meta={'item':item})if self.pageNum < 3:newUrl = format(self.url%self.pageNum)self.pageNum +=1yield scrapy.Request(newUrl,callback=self.parse)
图片
scchina.py
import scrapy
from picSave.items import PicsaveItemclass ScchinaSpider(scrapy.Spider):name = "scchina"# allowed_domains = ["www.xxx.com"]start_urls = ["https://sc.chinaz.com/tupian/"]def parse(self, response):lists = response.xpath('//div[contains(@class,"tupian-list")]/div')#print(lists)for li in lists:pic = li.xpath('./img/@data-original').extract_first()print(pic)item = PicsaveItem()item['src'] = 'https:' + picyield item
重新管道类pipelines.py
# Define your item pipelines here
#
# Don't forget to add your pipeline to the ITEM_PIPELINES setting
# See: https://docs.scrapy.org/en/latest/topics/item-pipeline.html# useful for handling different item types with a single interface
# from itemadapter import ItemAdapter# class PicsavePipeline:
# def process_item(self, item, spider):
# return itemfrom scrapy.pipelines.images import ImagesPipeline
import scrapy
#ImagesPipeline 专门用于下载的管道类
class imgsPileLine(ImagesPipeline):#根据图片地址进行图片数据的请求def get_media_requests(self, item, info):yield scrapy.Request(item['src'])#执行图片存储路径def file_path(self, request, response=None, info=None, *, item=None):imgName = request.url.split('/')[-1]return imgNamedef item_completed(self, results, item, info):return item #返回值会传递给下一个即将执行的管道类
setting.py
ROBOTSTXT_OBEY = False
LOG_LEVEL = 'ERROR'
USER_AGENT = "Mozilla/5.0 (Windows NT 10.0; Win64; x64) AppleWebKit/537.36 (KHTML, like Gecko) Chrome/110.0.0.0 Safari/537.36"
ITEM_PIPELINES = {"picSave.pipelines.imgsPileLine": 300,
}
IMAGES_STORE = './imgs'#存储的文件夹
items.py
# Define here the models for your scraped items
#
# See documentation in:
# https://docs.scrapy.org/en/latest/topics/items.html
import scrapy
class PicsaveItem(scrapy.Item):# define the fields for your item here like:src = scrapy.Field()# pass
下载中间件
位置:引擎和下载器之间
作用:批量拦截到整个工程中的所有请求和响应
拦截请求:UA伪装、代理IP
拦截响应:篡改响应数据
ua池貌似可以安装 库 fake-useragent
例子:
scrapy startproject wangyiPro
cd .\wangyiPro\
scrapy genspider wangyi www.xxx.com
wangyi.py
import scrapy
from selenium import webdriver
from selenium.webdriver.chrome.service import Service
from wangyiPro.items import WangyiproItemclass WangyiSpider(scrapy.Spider):name = "wangyi"#allowed_domains = ["www.xxx.com"]start_urls = ["https://news.163.com/"]block_urls = []#板块新闻url#实例化浏览器对象def __init__(self, name=None, **kwargs):s=Service('./chromedriver.exe')self.bro = webdriver.Chrome(service=s)def parse(self, response):lists = response.xpath('//*[@id="index2016_wrap"]/div[3]/div[2]/div[2]/div[2]/div/ul/li')listindex = [2,3,5,6,7]for index in listindex:blockUrl = lists[index].xpath('./a/@href').extract_first()self.block_urls.append(blockUrl)#依次对每个板块的页面进行请求for url in self.block_urls:#print(url)yield scrapy.Request(url=url,callback=self.parse_block)#解析每一个板块的内容,对应内容死动态加载获得def parse_block(self,response):divList = response.xpath('/html/body/div/div[3]/div[3]/div[1]/div[1]/div/ul/li/div/div')for div in divList:title = div.xpath('./div/div[1]//text()').extract()title = ''.join(title)detailUrl = div.xpath('./div/div[1]/h3/a/@href').extract_first()item = WangyiproItem()item['title']=title#对详情发起请求#print(title,detailUrl)yield scrapy.Request(url = detailUrl,callback=self.parse_detail,meta={'item':item})def parse_detail(self,response):content = response.xpath('//*[@id="content"]/div[2]//text()').extract()content = ''.join(content)item = response.meta['item']item['content'] = contentyield itemdef closed(self,spider):self.bro.quit()
settings.py
BOT_NAME = "wangyiPro"SPIDER_MODULES = ["wangyiPro.spiders"]
NEWSPIDER_MODULE = "wangyiPro.spiders"ROBOTSTXT_OBEY = False
LOG_LEVEL = 'ERROR'
USER_AGENT = "Mozilla/5.0 (Windows NT 10.0; Win64; x64) AppleWebKit/537.36 (KHTML, like Gecko) Chrome/110.0.0.0 Safari/537.36"DOWNLOADER_MIDDLEWARES = {"wangyiPro.middlewares.WangyiproDownloaderMiddleware": 543,
}ITEM_PIPELINES = {"wangyiPro.pipelines.WangyiproPipeline": 300,
}REQUEST_FINGERPRINTER_IMPLEMENTATION = "2.7"
TWISTED_REACTOR = "twisted.internet.asyncioreactor.AsyncioSelectorReactor"
FEED_EXPORT_ENCODING = "utf-8"
middlewares.py
from scrapy import signals
import time
from scrapy.http import HtmlResponse# useful for handling different item types with a single interface
from itemadapter import is_item, ItemAdapterclass WangyiproDownloaderMiddleware:def process_request(self, request, spider):return Nonedef process_response(self, request, response, spider):bro = spider.bro#获取了在爬虫类中定义的浏览器对象#挑选指定的响应对象进行篡改#通过url指定request#通过request指定responseif request.url in spider.block_urls:bro.get(request.url) #对板块对应的url进行请求time.sleep(3)pageText = bro.page_source #包含了动态加载的新闻数据#基于selenium便捷的获取动态加载数据newResponse = HtmlResponse(url=request.url,body=pageText,encoding='utf-8')return newResponseelse: return responsedef process_exception(self, request, exception, spider):pass
pipelines.py
from itemadapter import ItemAdapterclass WangyiproPipeline:def process_item(self, item, spider):print(item)return item
items.py
import scrapyclass WangyiproItem(scrapy.Item):# define the fields for your item here like:title = scrapy.Field()content = scrapy.Field()#pass
最后执行
scrapy crawl wangyi
需要浏览器驱动放置到scrapy.cfg同级目录
crawlspider
主要应用于全站爬取
scrapy genspider -t crawl name www.xxx.com
Rule() 规则解析器 将链接提取到的链接进行指定规则的解析
LinkExtractor 链接提取器 根据指定规则(allow)进行指定链接的提取
follow=True 可以将链接提取器继续作用到 链接提取器提取到的链接 所对应的页面中
思路如下:
spider.py
import scrapy
from scrapy.linkextractors import LinkExtractor
from scrapy.spiders import CrawlSpider, Rule
from sunpro.items import DetailItem,SunproItemclass SunSpider(CrawlSpider):name = "sun"#allowed_domains = ["www.xxx.com"]start_urls = ["http://wz.sun0769.com/"]rules = (Rule(LinkExtractor(allow=r"type=4&page=\d+"), callback="parse_item", follow=True),Rule(LinkExtractor(allow=r"question/\d+/\d+\.shtml"), callback="parse_detail", follow=False))def parse_item(self, response):trlist = response.xpath('')for tr in trlist:num = tr.xpath('').extract_first()title = tr.xpath('').extract_first()item = SunproItem()item['title'] = titleitem['num'] = numyield itemreturn itemdef parse_detail(self, response):id = response.xpath('').extract_first()content = response.xpath('').extract()content = ''.join(content)item = DetailItem()item['content'] = contentitem['id'] = idyield item
items.py
import scrapy
class SunproItem(scrapy.Item):# define the fields for your item here like:# name = scrapy.Field()title = scrapy.Field()id = scrapy.Field()class DetailItem(scrapy.Item): num = scrapy.Field()content = scrapy.Field()
pipelines.py
from itemadapter import ItemAdapterclass SunproPipeline:def process_item(self, item, spider):if item.__class__.__name__ == 'DetailItem':print(item['id'],item['content'])else:print(item['num'],item['title'])return item
分布式爬虫
需要安装 scrapy-redis
整体流程如下:
- 创建工程
- 创建一个机遇CrawlSpider的爬虫文件
- 修改爬虫文件:
- 导包:from scrapy_redis.spiders import RedisCrawlSpider
- 将 start_urls 和 allowed_domains进行注释
- 添加一个新属性:redis_key=‘sun’ 可以被共享的调度器队列的名称
- 编写一个数据解析相关的操作
- 将当前爬虫类的父类修改为 RedisCrawlSpider - 修改配置文件settings
- 指定可以被共享的管道: ITEM_PIPELINES={'scrapy_redis.pipelines.RedisPipeline':400}
- 指定调度器:
增加一个去重容器类的配置 DUPEFILTER_CLASS="scrapy_redis.dupefilter.RFPDupeFilter"
使用scrapy_redis组件自己的调度器 SCHEDULER="scrapy_redis.scheduler.Scheduler"
配置调度器是否持久化,当爬虫结束了,要不要清空redis SCHEDULER_PERSIST=True - redis相关操作配置:
- 配置redis的配置文件:
- windows:redis.windows.conf
- 代开配置文件修改:
将bind 127.0.0.1 进行删除
关闭包含模式:protected-mode yes改成no
- 结合配置文件开启redis服务 redis-server 配置文件
- 启动客户端 redis-cli - 执行工程:
scrapy runspider xxx.py - 向调度器的队列放入一个起始的url
- 调度器队列在redis客户端中输入命令:
lpush xxx www.xxx.com - 爬取到的数据存储到了redis 的proName:items这个数据结构中
如果redis不在本机,需要在配置文件settings中指定redis:
REDIS_HOST = '127.0.0.1`#REDIS的ip
REDIS_PORT = 6379
增量式爬虫
概念:检测网站数据的更新情况,只会爬取网站最新更新的数据
思路:将请求过的URL或信息进行存储(如元组中),下次请求前进行判断,如果已经有了则不再请求。
打包exe
使用pyinstaller生成exe可执行文件
安装pyinstaller:pip install pyinstaller
打包(选择主程序): pyinstaller -F main.py
打包时比较慢,进度条不走时可以按按回车
打包完成双击dist中main.exe即可运行
快捷键
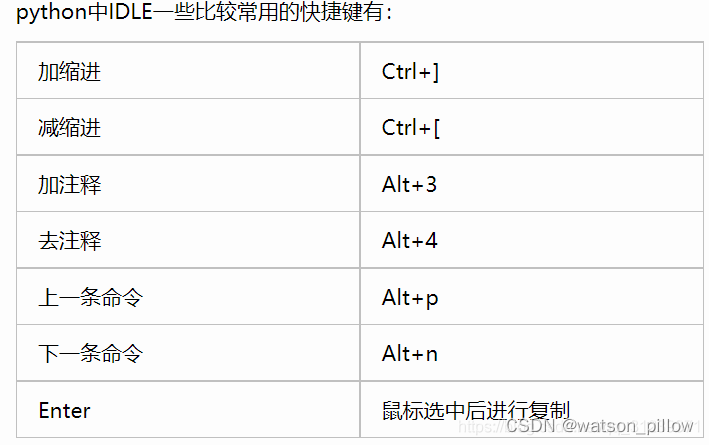
相关内容