
SpringCloudConfigServer配置中心使用与刷新详解
之前项目使用的是nacos作为配置中心,使用过程中,还是有不少问题的:
- 选用nacos,是同时使用了nacos的服务注册与发现,但是在生产环境,多个项目均出现了脑裂故障,包括1.x和2.x版本
后面弃用了nacos的服务发现能力,只保留了配置中心能力 - nacos有自己的管理后台,需要单独维护账号密码,不方便管理
注:好像也支持LDAP,没去研究 - 只能基于浏览器的富文本框编辑,编辑操作不方便
注:复制出去再复制回来?步骤多,容易出错 - 提交修改时,对比也是基于浏览器自带方案,还是不方便
- 历史版本追溯麻烦,检索不方便,无法对比,而且有30天时长限制
- 增加所有模块的通用配置,需要所有模块对应修改,增加
spring.cloud.nacos.config.shared-configs配置
基于上述原因,在新项目决定弃用nacos,改用SpringCloud原生的配置中心,理由:
- SpringCloud的配置中心,使用git作为配置数据源
- 支持gitlab、github、gitee等
- 本地文件,编辑方便
- git的版本管理机制,团队管理、提交、对比、分支合并等健全机制
- 支持多个默认的全局配置:
application.yml影响所有环境的所有模块application-test.yml影响test环境的所有模块xxx.yml影响所有环境的xxx这个指定模块xxx-test.yml影响test环境的xxx这个指定模块
当然,nacos有个优点,它集成了配置自动刷新能力;
而SpringCloud的配置中心,需要集成kafka或rabbitmq之类的消息中间件,才能有配置自动刷新能力。
下面介绍一下SpringCloud的配置中心使用。
本文基于:
- IDEA2022.1.3
- SpringBoot 2.7.9
- SpringCloud 2021.0.6
- java 1.8
一、搭建配置中心服务端
1、创建git配置存储
可以在git上新建一个项目存储,
也可以在现有的git项目里,新建一个子目录,专用于存储所有配置
我在gitee的一个现有项目里,新建了一个目录,叫 spring-configs,并事先上传了几个配置文件:
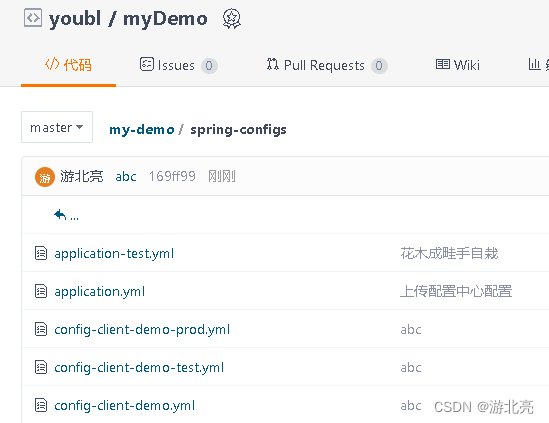
注:实际测试中,发现github基本都是连不上网络的状态,所以改用gitee来测试
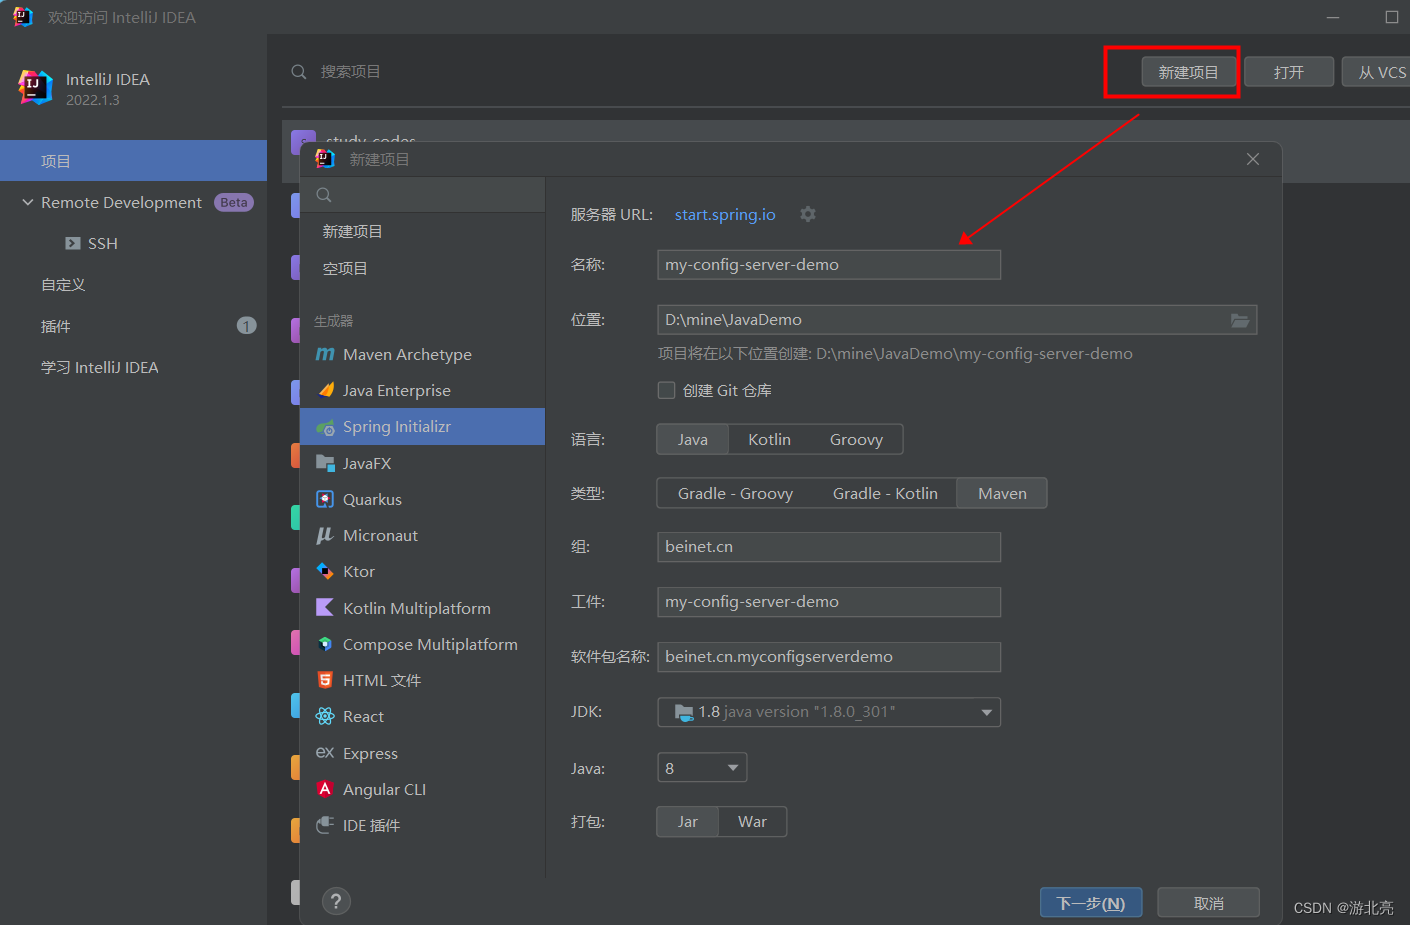
2、新建项目
在IDEA里新建项目,配置好名称、语言、组、类型、软件包、JDK版本、java版本等:
3、添加maven依赖
下一步里,选择Spring Boot版本 2.7.9(因为3.x不支持Java1.8),并勾选依赖项Config Server

注:建议新建项目里勾选依赖项,自己后面去修改pom.xml会麻烦一些
4、配置修改
- 打开
main函数所在类,添加注解@EnableConfigServer
import org.springframework.cloud.config.server.EnableConfigServer;@SpringBootApplication
@EnableConfigServer
public class MyConfigServerDemoApplication {public static void main(String[] args) {SpringApplication.run(MyConfigServerDemoApplication.class, args);}
}
- 删除resources目录下的
application.properties,并新建文件application.yml
注:我喜欢yml格式,你也可以直接编辑application.properties - 打开
application.yml,添加git配置:
server:port: 8999 # 配置中心服务端在8999端口监听spring:application:name: my-config-server-demo# 配置完直接启动即可,访问方式:# http://localhost:8999/{spring.application.name}/{spring.profiles.active}/{git分支}# {spring.application.name} 必需,就是具体项目的项目名(yml里配置的),不是config-server的哦# {spring.profiles.active} 必需,就是具体项目的环境(yml里配置的),注:具体项目可以不配置,使用默认值# {git分支} 可空,git配置文件所在的分支,默认使用下面的default-label## 注意:server项目启动后,会把git项目clone到本地,如windows系统会在 C:\Users\xxx\AppData\Local\Temp\config-repo-xxxcloud:config:server:git:uri: https://gitee.com/youbl/my-demo.git # git项目的url地址,支持gitlab、github、gitee等search-paths: spring-configs # git项目下,存放yml配置文件的子目录username: beinet # git账号password: 123456 # git密码default-label: master # 默认会获取main分支,不存在就报错: No such label: maintimeout: 6 # 读取git的超时时间,默认5秒#clone-on-start: true # 启动时把配置clone到本地,默认false,第一次访问会比较慢#basedir: c:/abc # 本地默认工作目录#refresh-rate: 100 # 服务从git更新配置的时间间隔,单位秒,默认值0,表示每次请求都去获取最新配置
5、OK,启动项目预览下
启动上面的项目,启动完成后,访问地址:http://localhost:8999/config-client-demo/test
可以看到类似如下的json,列出了该项目会访问到的所有yml文件,以及内容:
{"name": "config-client-demo","profiles": ["test"],"label": null,"version": "169ff9974ccc09c594995ceabac26c983cd607bf","state": null,"propertySources": [{"name": "https://gitee.com/youbl/my-demo.git/spring-configs/config-client-demo-test.yml","source": {"beinet.config": "配置中心的front-study-test值","beinet.tttt": "abdefssadfga"}},{"name": "https://gitee.com/youbl/my-demo.git/spring-configs/application-test.yml","source": {"beinet.config": "配置中心的全局-test值","beinet.tttt": "abdefs","beinet.newVal": "2惹2"}},{"name": "https://gitee.com/youbl/my-demo.git/spring-configs/config-client-demo.yml","source": {"beinet.config": "配置中心的front-study默认值","beinet.tttt": "abdefs"}},{"name": "https://gitee.com/youbl/my-demo.git/spring-configs/application.yml","source": {"beinet.config": "配置中心的全局值","beinet.tttt": "abdefs"}}]
}
二、SpringBoot客户端连接访问配置中心
配置中心服务端搭建完成,下一步就是配置客户端去连接和访问配置中心的配置了。
1、添加maven依赖
- 新建项目时,在依赖页面,直接勾选
Config Client即可完成依赖添加。
注:新建的项目,要打开pom,添加如下依赖:
org.springframework.cloud spring-cloud-starter-bootstrap
- 如果是旧的项目,打开项目的pom.xml文件,添加配置:
org.springframework.boot spring-boot-starter-parent 2.7.9 1.8 2021.0.6
org.springframework.cloud spring-cloud-starter-config org.springframework.cloud spring-cloud-starter-bootstrap
org.springframework.cloud spring-cloud-dependencies ${spring-cloud.version} pom import 2、添加bootstrap.yml配置
在项目的resources目录下,新建文件bootstrap.yml,内容参考:
spring:application:name: config-client-demo # 项目名,配置中心读取配置用cloud:config:uri: http://localhost:8999 # 指定配置中心的urlprofile: test # 指定使用哪个配置,可以搭配spring.profiles.active使用label: master # 指定分支,可为空,默认取主干
3、OK,启动客户端,输出一下在配置中心写的配置试试吧
测试的参考代码:
package beinet.cn.configclientdemo;import org.springframework.beans.factory.annotation.Autowired;
import org.springframework.boot.CommandLineRunner;
import org.springframework.boot.SpringApplication;
import org.springframework.boot.autoconfigure.SpringBootApplication;
import org.springframework.core.env.Environment;@SpringBootApplication
public class ConfigClientDemoApplication implements CommandLineRunner {public static void main(String[] args) {SpringApplication.run(ConfigClientDemoApplication.class, args);}@AutowiredEnvironment env;@Overridepublic void run(String... args) throws Exception {System.out.println(env.getProperty("beinet.config"));}
}
三、客户端配置刷新
客户端成功连接上配置中心后,只能在启动时读取配置,
如果git上的配置进行了修改,必须重启客户端,才能加载到最新的配置。
这里介绍一下,如何手动刷新客户端配置。
1、添加actuator依赖
打开客户端项目config-client-demo的pom.xml,添加如下依赖:
org.springframework.boot spring-boot-starter-actuator
org.springframework.boot spring-boot-starter-web
2、配置修改
打开客户端项目config-client-demo的bootstrap.yml,添加如下配置:
management:endpoints:web:exposure:include: "refresh" # 用*表示暴露全部
3、添加RefreshScope注解
在读取了配置,且需要刷新的类上添加RefreshScope注解,如:
@Component
@RefreshScope
public class ConfigTest2 {@Value("${beinet.newVal}")String str3;public String getStr3() {return str3;}
}
4、调客户端接口,刷新配置
OK,当配置中心的配置发生了变更时,手工调用客户端的接口即可完成配置刷新:
POST http://localhost:8080/actuator/refresh
对应的CURL命令: curl -X POST http://localhost:8080/actuator/refresh
执行完接口请求,可以看到客户端的日志,会多出重新加载配置的日志,例如:
2023-03-22 13:38:37.976  INFO 2260 --- [nio-8080-exec-8] c.c.c.ConfigServicePropertySourceLocator : Fetching config from server at : http://localhost:8999
2023-03-22 13:38:38.844  INFO 2260 --- [nio-8080-exec-8] c.c.c.ConfigServicePropertySourceLocator : Located environment: name=config-client-demo, profiles=[test], label=master, version=e5b67cb61ad976c2c1bd863dae769aabf1553c21, state=null
2023-03-22 13:38:38.844  INFO 2260 --- [nio-8080-exec-8] b.c.PropertySourceBootstrapConfiguration : Located property source: [BootstrapPropertySource {name='bootstrapProperties-configClient'}, BootstrapPropertySource {name='bootstrapProperties-https://gitee.com/youbl/my-demo.git/spring-configs/config-client-demo-test.yml'}, BootstrapPropertySource {name='bootstrapProperties-https://gitee.com/youbl/my-demo.git/spring-configs/application-test.yml'}, BootstrapPropertySource {name='bootstrapProperties-https://gitee.com/youbl/my-demo.git/spring-configs/config-client-demo.yml'}, BootstrapPropertySource {name='bootstrapProperties-https://gitee.com/youbl/my-demo.git/spring-configs/application.yml'}]
2023-03-22 13:38:38.846  INFO 2260 --- [nio-8080-exec-8] o.s.boot.SpringApplication               : No active profile set, falling back to 1 default profile: "default"
2023-03-22 13:38:38.849  INFO 2260 --- [nio-8080-exec-8] o.s.boot.SpringApplication               : Started application in 0.998 seconds (JVM running for 402.306)
配置中心的front-study-test值..
5、刷新备注说明
- 通过
Environment的Bean读取配置,会被刷新 - 没加
RefreshScope注解的配置,不会被刷新 - main函数所在类,不会被刷新,即使增加了
RefreshScope也不行
四、通过bus消息总线自动刷新所有客户端配置
上面的方法,只能刷新单个客户端的配置,不会刷新其它服务的配置,
甚至,如果某服务部署了多台机器,那么其它机器也不会被刷新。
你需要知道每个服务部署了哪些机器,一台机器一台机器的去调用接口刷新。
这一节,介绍一下如何在配置中心服务端通知所有客户端去自动刷新配置。
原理说明:
- 调用配置中心服务端的API,通知刷新
- 配置中心服务端把消息投递到Kafka
- 所有客户端监听Kafka消息,进行刷新配置
1、服务端添加依赖和配置
- 打开配置中心服务端的
pom.xml,添加如下依赖:
org.springframework.boot spring-boot-starter-actuator
org.springframework.cloud spring-cloud-starter-bus-kafka
- 打开配置中心服务端的
application.yml,添加如下配置,启用bus消息推送:
spring:cloud:# 启用bus后,对应的消息队列(如kafka)会自动创建一个topic springCloudBus# 使用 curl -X POST http://localhost:8999/actuator/busrefresh 会触发消息推送到这个topic,供client使用bus:refresh:enabled: truekafka:bootstrap-servers: 10.1.2.3:9092  # 用到的Kafka连接信息
management:endpoints:web:exposure:include: "busrefresh"   # 用*表示暴露全部
OK,可以启动配置中心服务端了。
2、客户端添加依赖和配置
- 打开每个客户端的
pom.xml,添加如下依赖:
org.springframework.boot spring-boot-starter-actuator
org.springframework.cloud spring-cloud-starter-bus-kafka
- 打开每个客户端的
bootstrap.yml,添加kafka配置,启用bus消息消费:
spring:kafka:bootstrap-servers: 10.1.2.3:9092 # 用到的Kafka连接信息
OK,把这些客户端启动吧。
3、调服务端接口,刷新所有客户端配置
OK,当配置中心的配置发生了变更时,
还是要手工调用接口,但是是调用服务端的接口,即可完成所有客户端的配置刷新:
POST http://localhost:8999/actuator/busrefresh
对应的CURL命令: curl -X POST http://localhost:8999/actuator/busrefresh
执行完接口请求,可以看到服务端,以及每个客户端,都会多出重新加载配置的日志
最后,原生的配置中心就是这点不好,改了配置,一定要手工调接口,才能刷新。